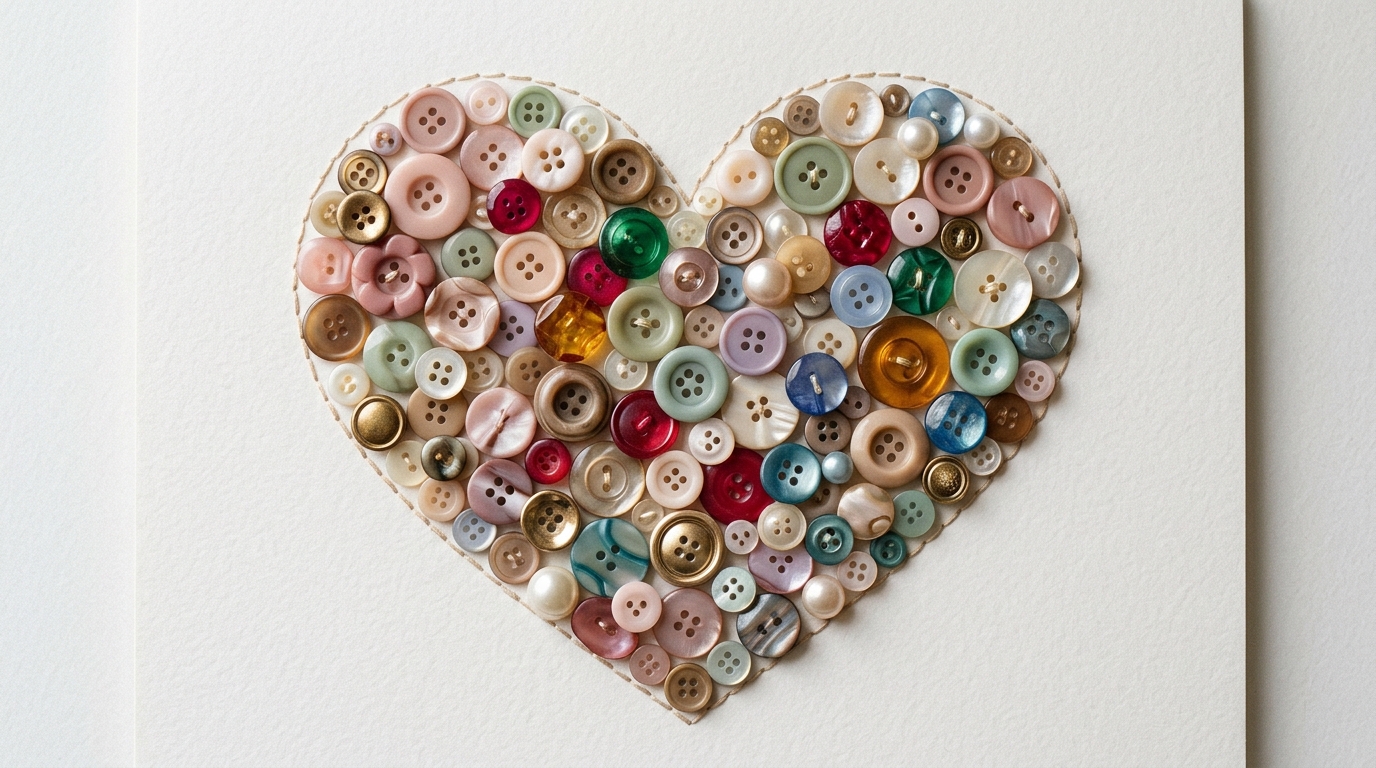
Easy Button Heart Craft for Kids
A button heart craft is a simple kids’ activity where buttons are arranged and glued onto a heart-shaped template made from cardstock, canvas, or backing board to create colorful, textured art.
Last updated: June 2026
Quick Answer: Button Heart Craft
A button heart craft is genuinely as easy as it looks. You trace a heart, fill it with buttons, let it dry, and you’ve got something beautiful enough to frame. No special skills required, no expensive supplies, and it works for kids from toddler age all the way up to tweens. The whole project takes about 20 to 30 minutes, with only 10 to 15 minutes of active crafting time and the rest hands-off drying.
A lot of parents assume button crafts are fussy or that you need a huge collection of matching buttons before you can even start. Honestly? Not true at all. One bag of assorted buttons from the dollar bin and a piece of cardstock is all it takes. This is the rainy afternoon craft that actually works, the sick-day activity that requires almost no energy from you, and the week-before-Valentine’s-Day project that produces something genuinely gift-worthy.
It’s also purposeful play. Button sorting and placing builds the fine motor skills kids need for writing, and it works beautifully as a handmade Valentine’s Day decoration or a heartfelt gift for grandparents, teachers, or family friends.
What You’ll Need (Materials)
One of the best things about this craft is how flexible the supply list is. You can go minimal with just cardstock and craft glue, or level it up to a framed canvas piece. Here’s everything you might need, with the must-haves in bold.
- Heart template or free printable: 5 inches by 5 inches for small art, 8 inches by 8 inches for framed display. Print directly onto cardstock or trace onto your surface with a pencil.
- Surface of your choice: heavy cardstock (65 lb or heavier), a 5×7 or 8×8 canvas panel, or foam core board cut to fit a frame. Cardstock is the most beginner-friendly; canvas gives you a display-ready piece without a frame.
- Buttons: approximately 80 to 120 mixed buttons for a 5-inch heart, or 150 to 200 for an 8-inch heart. A standard 10-oz craft store button bag covers a 5×7 heart with some left over.
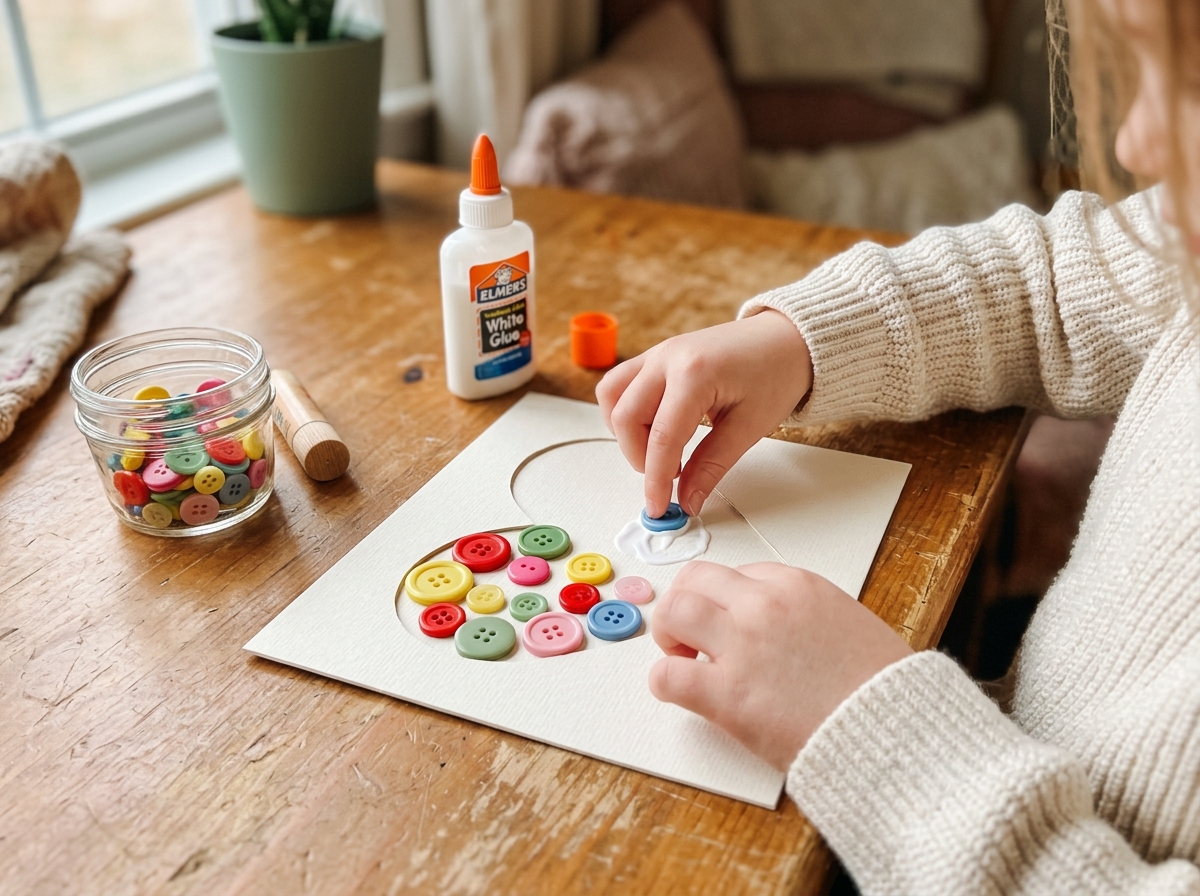
- Craft glue or a low-temp glue gun: white craft glue (like Elmer’s) is strongly recommended for toddlers and preschoolers. A glue gun should be adult-use only, or closely supervised for ages 7 and up.
- Pencil: for tracing the template onto your surface.
- Optional: patterned or solid-color background paper mounted before tracing the heart, for extra visual contrast.
- Optional: picture frame in a 5×7 or 8×10 size to display the finished piece.
- Optional: acrylic paint to color the background of a canvas panel before gluing buttons down.
For budget sourcing, the dollar bin at Michaels and Target’s Dollar Spot are consistently the best places to find assorted buttons cheaply, especially in the weeks leading up to Valentine’s Day. Thrift store sewing notions sections often have button jars for almost nothing, and Amazon bulk assorted button packs (500 or more buttons for around $7 to $10) are worth it if you plan to do multiple projects. One standard bag is genuinely enough for a full 5-inch heart craft with room to spare.

How to Make a Button Heart Craft (Step-by-Step)
These steps work for the basic cardstock version, but the same process applies if you’re using a canvas panel or foam core. I’ve flagged which steps kids can tackle on their own and which ones need an adult nearby.
- Print or trace your heart template. Download a free printable heart and print directly onto cardstock, or trace it with a pencil onto your chosen surface. Aim for a heart at least 5 inches tall since anything smaller doesn’t leave enough room for little hands to place buttons comfortably.
- Prep your surface. If you’re using a canvas panel or foam core, cut your background paper to size and adhere it before drawing the heart. Painting the background a contrasting color (white on red, navy on canvas) makes the finished button art pop. This step is fully adult-led.
- Sort buttons by color. Pour buttons onto a tray and let kids sort by color or size before anything gets glued. This 5-minute step doubles as fine motor practice and helps them plan their color scheme. Toddlers love this part independently, and it buys you a few minutes of calm.
- Apply glue inside the heart outline. For white craft glue, work in small 2-inch patches so it doesn’t dry before buttons are placed. For a glue gun, adults apply a small dot and the child places the button immediately. Never let toddlers handle a glue gun, even low-temp ones.
- Press buttons flat-side-down into the glue. Remind kids to press and hold each button for 3 to 5 seconds. Mixing sizes helps: larger buttons fill space faster, smaller ones fill the gaps between them.
- Fill gaps with small buttons or seed beads. Once the larger buttons are placed, go back and tuck small buttons or seed beads into any visible gaps for a fully covered, polished look. Older kids can do this step almost entirely on their own.
- Let it dry completely before moving. White craft glue needs at least 1 hour lying flat, ideally overnight. Glue gun bonds dry in 5 to 10 minutes. Don’t lift or frame the piece before it’s fully dry or buttons will shift.
- Frame or display your finished heart. Slide the art into a frame, loop a ribbon on the back for hanging, or leave it freestanding as a tabletop decoration. A $2 to $4 dollar-store frame in white or gold instantly makes it look like real wall art.
Age-by-Age Guide: Who Can Do What
This is the part most craft tutorials skip, and it matters. The same project plays out very differently for a 2-year-old versus a 7-year-old, and knowing what to expect helps you set up for success instead of frustration.
Toddlers (Ages 2 to 3)
At this stage, the adult does the tracing and applies glue in small sections. The child’s job is to pick buttons and press them down. Simple. stick to chunky, large-format buttons that are easy to grip, and skip any button smaller than 1.25 inches in diameter due to choking risk. The American Academy of Pediatrics recommends keeping small parts away from children under age 3 entirely.
Expect a “scattered” look with gaps and overlapping buttons. That’s completely fine, and honestly kind of the charm of a toddler-made heart. The pride on their face when it’s done? Priceless. If your toddler isn’t quite ready for the gluing step, no-mess painting is a lower-stakes way to let them make something colorful alongside the older kids.
Preschool and Kindergarten (Ages 4 to 6)
Kids this age can trace their own heart with light help and apply white craft glue with a small brush. This is also a great age to introduce color planning: “Let’s make it all pink and red for Valentine’s Day!” or “Pick only your three favorite colors.” They can do nearly the whole project independently, which is a big confidence boost. Stick with white craft glue at this stage.
Big Kids (Ages 7 to 10)
Older kids can use a low-temperature glue gun with close adult supervision and are capable of planning more intentional designs. An ombre gradient, a pattern, even initials spelled out in buttons. This age group also has the patience to fill every gap, which results in a much more polished finished piece. Genuinely frame-worthy.
Variations: 5 Ways to Mix It Up
The basic button heart is great on its own, but once you’ve made one, you’ll want to try more. These go from simplest to most involved.
1. Ombre Color Gradient Heart
Sort your buttons in one color family from lightest to darkest, then place pale shades at the top of the heart and deepen toward the bottom. Pale pink to hot pink to red looks stunning framed and is genuinely one of the most giftable versions of this craft. Grandparents go wild for it.
2. Rainbow Button Heart
Arrange buttons in color-order stripes across the heart from top to bottom. This is especially great for kids who enjoy color sequencing, and it gives the project a little extra structure if your child needs something to follow. Very satisfying result.
3. Button Heart on Canvas (Display-Worthy Version)
Swap cardstock for a 5×7 or 8×8 stretched canvas panel. Paint the background with acrylic paint and let it dry before adding buttons. The result is a permanent piece of wall art that doesn’t need a frame and looks like something you’d buy at a boutique. This is the version to make when the goal is keeping it rather than gifting it.
4. Valentine’s Day Card Version
Use a 4×6 piece of cardstock and a small 2-inch heart template. Glue on 15 to 20 tiny buttons, let it dry, and tuck it in an envelope. A 3D Valentine card that kids can make for classmates, grandparents, or teachers. Much more memorable than a store-bought card. Start making these a few days before Valentine’s Day to give the glue time to fully dry before the cards travel.
5. Monogram Heart
Instead of filling the entire heart with buttons, draw a large letter initial inside the heart outline and glue buttons only along the letter shape. It turns into a personalized room decor piece or a genuinely thoughtful gift. Spell out a name one letter at a time if your child has patience for multiple sessions.
Tips for the Best Results (and What to Avoid)
A few things that make a real difference between a button heart that holds up beautifully and one that loses half its buttons before it makes it to the frame.
- Don’t skip the template step: Free-handing a heart almost always results in a lopsided shape. Even adults benefit from tracing. Print or trace every time.
- White craft glue vs. glue gun: Craft glue dries slowly and lets kids reposition buttons, which is ideal for younger ages. A glue gun bonds in seconds and is better for older kids who’ve already planned their layout and won’t change their minds halfway through.
- How many buttons do you actually need: Budget 100 to 120 buttons per 5-inch heart. One standard 10-oz assorted button bag (about $4 to $6 at Michaels) is enough for a 5×7 heart with leftovers for next time.
- Buttons keep falling off: This usually means glue dried over before the button was pressed down. Work in 2-inch patches and press each button firmly for a full 5 seconds, not just a quick tap.
- Sealing the finished piece: A light coat of Mod Podge over the fully dried heart seals buttons in place and adds a subtle gloss. This is especially worth doing in humid climates, where white craft glue can loosen over time.
- Cleanup: White craft glue wipes up with a damp cloth before it dries. Lay down a silicone mat or parchment paper under the project to protect your table. Honestly one of the cleaner crafts out there.
Displaying and Gifting Your Button Heart
One of the things that makes this craft stand out is how easily it transitions from “thing we made at the kitchen table” to “actual wall art.” A few simple display options depending on where it’s going.
- Frame it: A $2 to $4 dollar-store frame in white or gold takes the cardstock version from cute to polished in about 30 seconds. No mat needed.
- Ribbon hang: Hot-glue a loop of ribbon to the back for a door or window decoration. This works beautifully as a Valentine’s Day seasonal display and stores flat in a keepsake box afterward.
- Gift for grandparents: Slide the finished art into a clear acrylic frame and write the child’s name, age, and year on the back in permanent marker. One of the most genuinely thoughtful handmade gifts for Valentine’s Day, Mother’s Day, or a birthday, and it costs well under $10 total.
- Classroom display: Make a small version (2-inch heart template on a 4×4 card) for each student in the class and mount them on a red or pink cardstock bulletin board display. Very manageable as a group activity if you pre-cut all the hearts.
For gifting, the canvas version is particularly impressive because it ships flat, doesn’t need extra framing, and looks finished the moment someone opens it. If you’re giving it to a teacher or a relative who lives far away, a thin canvas panel fits in a padded mailer without much trouble. The National Association for the Education of Young Children consistently highlights open-ended art activities as meaningful for early childhood development, and this one fits that description well.
The best part is that kids who make this want to give it away. That’s rare. Most crafts end up in a pile on the counter. This one gets handed to grandma with two hands and eye contact. Keep that in mind if you’re looking for something meaningful to make together before the next holiday. For a fall take on the same make-and-gift idea, the handprint Thanksgiving crafts are another keepsake that grandparents hold onto for years.
Frequently Asked Questions
What is the best glue for a button heart craft?
White craft glue (like Elmer’s) is the best choice for toddlers and preschoolers because it dries slowly, giving kids plenty of time to place and reposition buttons. A low-temperature glue gun creates a stronger, faster bond and works well for ages 7 and up with adult supervision. For a permanent keepsake piece, a light coat of Mod Podge over the finished, dried heart adds extra hold and a nice gloss finish.
How many buttons do I need for a button heart craft?
A 5-inch heart template takes approximately 80 to 120 standard mixed buttons. An 8-inch heart needs 150 to 200 buttons. One standard 10-oz craft store button bag (about $4 to $6) covers a 5×7 heart comfortably with some left over for filling gaps or starting a second project.
Is this craft safe for toddlers?
Yes, with one important note: avoid small buttons with children under age 3 due to choking risk. The U.S. Consumer Product Safety Commission considers any object that fits entirely inside a small-parts tester (roughly 1.25 inches or smaller) a potential choking hazard for children under 3. Use large, flat buttons and have an adult handle all glue steps for this age group.
Can I use this as a Valentine’s Day gift?
Absolutely. A button heart mounted in a simple frame is a heartfelt, low-cost handmade gift for grandparents, teachers, or family friends. Write the child’s name, age, and year on the back in permanent marker to turn it into a keepsake. The canvas version works especially well as a gift because it looks finished and display-ready without any extra framing.
Where can I find cheap buttons for this craft?
The best budget sources are the dollar bin at Michaels, Target’s Dollar Spot (especially in the weeks before Valentine’s Day), thrift store sewing notions sections, and Amazon bulk assorted button packs (500 or more buttons for $7 to $10). A single bag is enough for multiple projects, so it’s worth buying one full bag rather than individual small packs each time.


